Self-designed · Step-by-step guide
Create a solar-only design
Follow a solar project from equipment selection through roof layout, wiring and plan-set review.
Before you start
- A project address and site information.
- Panel, inverter and mounting product information.
- Verified electrical ratings and the roof details needed for your design.
1. Start a self-designed project
Choose the path where you create and review the design.
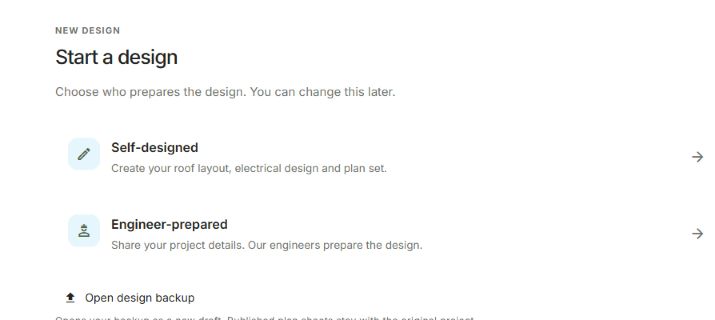
- Start a new project and choose Self-designed.
- Enter the project address and check the location.
- Open Project details to review the customer, installer and site information.
2. Select solar equipment
Choose Solar, then specify how your panels convert power.
- Choose AC panels, Microinverters or String inverters under Power conversion.
- Select the panel model and quantity, then the applicable inverter equipment.
- In Mounting, choose where the panels will go, the roof material, rails and attachments.
Hybrid inverters used without a battery can be available under String inverters. Product compatibility still needs review.
3. Complete property and connection details
These answers determine the available connection options and design checks.
- Review Electrical service under Property details.
- Review Roof & structure, including the framing and site conditions.
- Open Connection setup and choose a suitable interconnection. Review any equipment or rating warnings.
An unverified value is a suggestion. Confirm it only after checking the source.
4. Draw the roof and place modules
Open design workspace to give the drawing more room.
- In Roof layout, trace or select the roof face and check its pitch and direction.
- Select Portrait or Landscape for module placement.
- For Suggest layout, choose the selected orientation only or Try both.
- Inspect the preview, then apply it. Check pathways, obstructions and module quantities.
- Review any structural findings in Layout before continuing.
A suggested layout still needs review. Resolve reported mounting or support issues before creating your plan set.
5. Connect the modules
Use the Wiring step to build the circuits from the physical layout.
- Choose the destination equipment or input for the circuit.
- Use Connect automatically to preview connections, or draw the branch or string manually.
- Review the preview before applying it. Keep existing branches unless you intend to replace them.
6. Review electrical equipment and schedules
Move through Electrical review, Equipment & routing, and Schedules & notes.
- Generate or review the one-line drawing and resolve its reported findings.
- Place equipment and review the routes and conductor lengths.
- In Schedules & notes, check the conductor schedule. All fields reveals additional editable columns.
- Use each circuit name in the missing-data list to locate its row. Review the equipment summary and notes.
Existing load current may be unknown on an existing conductor. Do not invent a value to clear a warning.
7. Create and review the plan set
The plan set brings the current design into the selected sheet template.
- Open Plan set and choose Create plan set.
- If generation reports a problem, return to the named face, circuit or field and resolve it.
- Review every generated sheet for project information, placement, schedules and notes before exporting.
Generating sheets does not establish permit approval or replace engineering review where required.