Conductor schedule · Step-by-step guide
Edit a circuit’s route length
Find a circuit, enter its measured length, and return to an automatic length when needed.
Before you start
- An electrical drawing with connected equipment.
- The circuit letter and an actual route measurement. The 30 ft value below is only a practice example.
1. Find the circuit
Open Electrical, then Schedules & notes and Conductors.
- Match the CIRCUIT letter to the connection on your drawing.
- Check the ROLE. Our Powerwall-to-gateway connection is Battery AC, circuit B.
- If LENGTH is hidden, choose More columns below the table. Scroll sideways for additional fields.
2. Enter the measured length
Click the LENGTH value, type the number of feet, then press Tab.
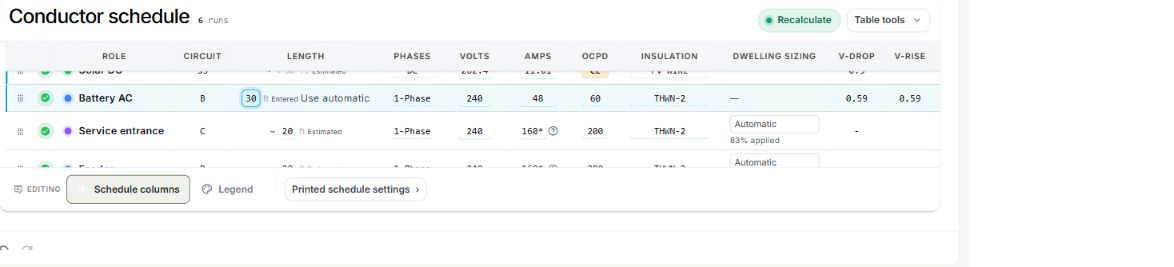
- Check that the value appears with Entered beside it.
- Our practice circuit changes from an estimated 20 ft to an entered 30 ft.
- Let calculations finish. Recalculate refreshes the schedule and preserves the entered length.
Estimated is a planning value. Entered means someone supplied it. Neither label proves that a route has been measured.
3. Return to an automatic length
Choose Use automatic beside the entered length when you want SDL to derive it again.
- SDL replaces your entry with a routed length or a planning estimate.
- Read the value and label. In this example it returned to Estimated, 20 ft.
- If your measurement is still correct, keep it entered instead.
4. Check the saved result
Wait for Saved, reopen the project and return to the same row.
- Open More columns again if LENGTH is hidden.
- Check the value and label. Our 30 ft entry remained after reopening.
- Review remaining electrical tasks separately. A length edit does not resolve an unrelated equipment or project-data finding.
More columns changes what you can edit here. Printed schedule settings is a separate control for the sheet table.