Roof mounting · Step-by-step guide
Use different supports on one roof face
Split a roof into framing areas when the support direction, spacing or attachment product changes.
Before you start
- Start with a roof face already drawn. A framing area describes a change underneath the same roof surface; it does not create another roof face or move your panels.
- Have the actual framing direction, support spacing and attachment products for each part of the roof. This workflow supports railed rafter/truss and deck-mounted arrangements.
1. Split where the construction changes
Open Roof layout, then Layout. Select the roof face itself, away from a panel.
- In the right-hand sidebar, expand Framing areas and choose Split roof.
- Click two distinct points along the boundary between the support areas. The line through those points divides the roof.
- Look for the A1 and A2 choices in the sidebar. These identify the new areas; the roof pitch and panel layout stay in place.
A1 does not always mean the left side. Match the area labels on the drawing before changing its settings.
2. Set the supports for each area
Select A1 or A2 before editing. The message below the controls tells you which area will change.
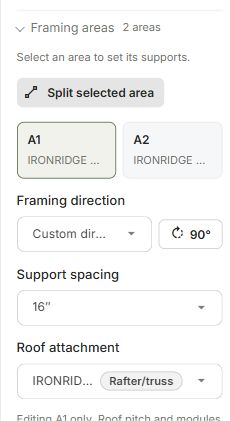
- Set Framing direction to match the actual supports. The 90° button turns the direction by a quarter turn; Follow roof direction uses the roof setting again.
- Set Support spacing to the actual distance between supports. A value marked roof setting is inherited from the roof.
- Choose the Roof attachment for this area. The Rafter/truss and Deck tags distinguish how the products attach.
- Select the other area and enter its settings. In our example, A1 uses IRONRIDGE HUG-TRUSS and A2 uses IRONRIDGE HUG-DECK.
Choose products and spacing for the actual construction. The example is not a recommendation to use those products or dimensions on every roof.
3. Check both areas after saving
Switch between A1 and A2 to check that each area has the intended settings.
- Wait for Saved in the top bar, then reopen the project.
- Select the roof and expand Framing areas again. Check each area’s attachment, direction and spacing.
- Read any layout warning and resolve the specific issue it identifies. Saving the area settings does not mean all mounting checks have passed.
Need another region? Select the area to divide, then use Split selected area. Keep one physical roof face when only its support construction changes.