Roof mounting · Step-by-step guide
Solar panel clamping and blocking
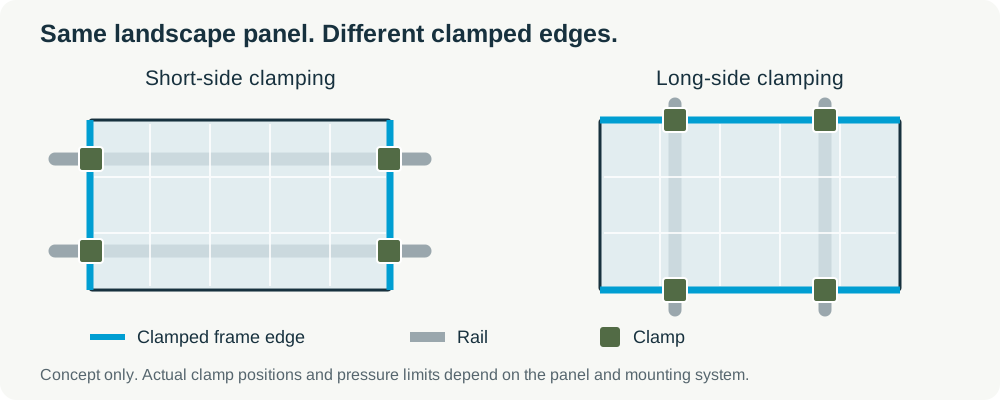
Short-side clamping usually has lower wind-pressure limits. Use SDL to set long-side mounting and add blocking where the framing needs it.
Before you start
- A roof layout with panels placed and the panel, rail and roof-attachment products selected.
- The actual roof construction and project wind conditions entered in Details. These affect which mounting arrangements SDL can calculate.
1. Check which edges are clamped
Long-side and short-side describe the panel frame edges held by the clamps. They do not mean portrait and landscape. A landscape panel can use long-side clamping when its rails run in the appropriate direction.
- Open Panels and select the roof face. Find Panel clamping and read the clamped-edge caption below Mounting layout.
- If SDL reports a short-side pressure warning, read the wind demand and whether it is compared with a manufacturer rating or a preliminary estimate. If demand exceeds it, follow the long-side mounting steps below.
Short-side configurations commonly have lower allowable pressure, so they can be unsuitable in high wind. The exact panel and mounting configuration govern. Changing the rails does not reduce the wind pressure acting on the array.
2. Set the project mounting default
For a project that needs long-side clamping, open Details → Mounting → Project mounting default. SDL selects the supported blocking arrangement for eligible rafter/truss mounts, or direct rails for eligible deck mounts.

- Set Panel clamping to Always clamp long sides.
- Return to Panels and select a roof. Its Project default row shows the project policy.
- Check the resulting rails, mounts and clamped-edge caption. Panel positions stay in place.
Automatic uses each roof’s supported arrangement and may already select long-side mounting. A roof with its own Mounting layout keeps that override when the project default changes. Choose Use project default on that roof to clear its override.
3. Change one roof, if needed
If the project default already gives this roof long-side clamping, continue to the checks below. To change only one roof, use its Mounting layout. Blocking is lumber fitted between rafters or trusses to support attachments where the long-side rails need them.
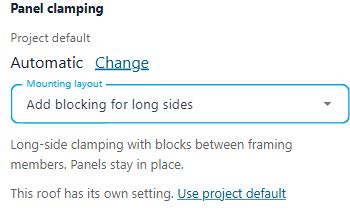
- In Panels, select the affected roof and open Mounting layout under Panel clamping.
- If Add blocking for long sides is offered, select it. SDL lays out the blocks, attachments and rails and calculates their loads. Eligible deck-mounted roofs instead offer Clamp long sides, without wood blocks.
High wind alone does not mean every roof needs blocking. Deck attachments fasten to the roof sheathing; their connection and the underlying roof still need their own checks. If neither long-side option is offered, review the selected products and any unsupported-arrangement message.
4. Review the blocking and structural checks
When blocking is present, expand Mounts & rails → Blocking details on the selected roof.
- Check the block construction, quantities and check results. SDL’s standard arrangement uses No. 2 Spruce-Pine-Fir (SPF) 4×4 lumber with a Simpson A34 angle at each end. Follow the printed construction detail for connector orientation and the exact nail schedule.
- Review the current Structural check. Long-side clamping still needs passing panel, rail, attachment and blocking-connection checks.
- Address any specific failed or unsupported arrangement SDL reports before treating the design as ready.
Blocking does not increase a panel’s short-side rating; it supports a different rail and clamp arrangement. SDL’s standard blocking assembly does not cover 2×2 rafters or truss members. Stronger wind can also exceed the end-connection capacity even when the timber passes.
5. Check the updated plans
Open Plan set and update the sheets after the mounting change.
- Inspect the attachment plan for the actual rail directions, mounts and any wood blocks.
- Check that the module detail identifies the actual clamped edges and clamp dimensions.
- For blocking, review the construction detail and material quantities. For direct deck mounting, there should be no wood-block hardware added by this setting.
- Wait for Saved, then inspect the corresponding sheets in your downloaded PDF.
A clamping selection does not clear unrelated structural or electrical failures. Review actions such as Set long-side mounting open the relevant control; they do not apply the edit for you.
Common questions
Does short-side clamping always have a lower pressure rating?
Short-side clamping commonly has a lower allowable pressure, but there is no universal rating for every panel and clamp arrangement. Use the applicable manufacturer configuration. When SDL shows a preliminary short-side estimate, that estimate is not a manufacturer-tested rating.
Do all high-wind roofs need wood blocking?
No. If short-side clamping cannot meet the wind demand, use a supported long-side arrangement. A rafter or truss layout may need blocking to support its attachments. An eligible deck-mounted layout can clamp the long sides without wood blocks. The complete selected arrangement still has to pass its checks.
Why did one roof stay on short-side clamping?
An explicit roof setting takes priority over the project default. Select that roof, read Mounting layout, and choose Use project default if it should follow Always clamp long sides. Across slope and Up slope describe rail direction; check the resulting clamped-edge caption.
Can I use this setting for every mounting system?
No. These choices apply to supported railed roof arrangements. Seam clamps, railless systems, mixed deck/framing support, ground mounts and independent tilt arrangements have separate requirements. SDL does not create a generic blocking solution for them.